Working With Layer Masks
The Basic Principles of Layer Masks
-

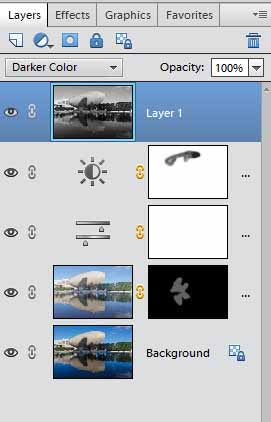
Layer masks appear
in right hand side of the layer in the layer palette. For
example,
there are five layers in the layer palette on the right.
Three of them
have layer masks. It should be noted that all adjustment
layers have
layer masks. For adjustment layers the default is white.
- You
may add a white layer mask to a regular (pixel) layer with the command
"Layer -- Layer mask -- reveal all" or clicking on the
 icon at the top of the
layers palette.
- You may add a black layer mask to a regular (pixel) layer
with the command "Layer -- Layer mask -- hide all" or clicking alt -
 .
.
- If a portion of a layer mask is black that has the effect
of making
the layer transparent in that portion. If it is gray then it
is
partially transparent. Black has the effect of masking (or
blocking)
the effect of a layer from the layers below. Thus, on the
right, in
the second layer down only a small part of the effect of the adjustment
layer is blocked causing the action of the adjustment layer to not take
effect in that area. In the third layer the layer mask is all
white
thus the adjust is in effect for the entire image. The last
layer mask
is almost all black. This makes that layer transparent except
for the
small gray area in the middle.
- If
you have a selection and create an adjustment layer its layer mask will
be white in the part that is selected and black in the areas that are
not selected.
- If you have a selection and add a layer mask to that layer
by clicking on
 the selected part will be white and
the rest black. If you do an alt -
  the reverse will be true.
- If
you select a layer mask and press ctrl-I on the keyboard you will
invert the layer mask. All white areas will become black and
black
areas will become white. Grays will also invert -- 25% gray
will
become 75% gray, etc.
- Click on a layer mask in the layers
palette and paint on it with white you will make its effect be applied
to the layers below. If you use an opacity of less than 100%
it will
turn black into gray.
- If you paint black on a layer mask it
will block that layer's effect on the layers below. An
opacity of less
than 100% will turn white into gray.
- The big advantage of layer
masks is that you can tweak them by painting white on dark
portions
and black on white portions. So, for example, if you paint
black over
too much area you can paint white over the part you over painted to
correct it.
Making Local Adjustments with Adjustment Layers
- Open an image that needs local adjustments (say the entire
foreground needs to be lightened but the background needs to remain the
same.)
- Create a duplicate layer.
- Create a levels adjustment layer with the command "Layers -- New Adjustment Layer -- Levels".
- Using the levels dialog box adjust the levels so that the foreground is correct. The background will now be incorrect.
- With the levels adjustment layer active, paint black on the
background of the image. This will cause the layers effect to be
blocked and the image will become darker. If you use opacity at
100% the layer mask will go completely black but if you use a lower
opacity the background will go gray so that the area painted will
become darker but not back to the original image.
- Now open another image that needs local adjustments (say the face in a portrait needs to have a little more saturation.)
- Create a duplicate layer.
- Create a hue/saturation adjustment layer with the command "Layers -- New Adjustment Layer -- Hue/Saturation"
- Using the Hue/Saturation dialog box adjust the saturation so that the face is over saturated.
- Now with the Hue/Saturation layer active press ctrl-I. This
will cause the layer mask to invert. Since it was all white it
becomes all black. This will hide the effect of the over
saturation since it blocks the entire layer.
- Now paint white on the face. This will let the face
corrections come through. Since you over saturated you should use
an opacity of less than 100%, probably something like 25%. You
can paint over the same parts of the face multiple times increasing the
saturation. Continue this until the face is properly saturated.
- For the last adjustment layer example open an image that needs to have its sky darkened.
- Create a duplicate layer.
- Select the sky using your favorite selection tool. The quick selection tool is a good one.
- Open a levels adjustment layer. Note the layer mask is white in the sky and black elsewhere.
- Also note that the histogram in the levels dialog box reflects only the sky, not the rest of the image.
- Now adjust the levels. Since only the sky was selected only
the sky will be effected. The rest of the levels adjustment layer
is blocked out.

Using Pixel Layers to Enhance an Image with Layer Masks
-
Blur the background in a photo
- Open an image that has a main image and a busy background.
- Create a duplicate layer. Name that layer "blur"
- Create another duplicate layer. Name that layer "top"
- Hide the top layer.
- Make active the blur layer.
- With the command "Filter -- Blur -- Gaussian Blur" blur the blur layer. Set the radius to 20, more or less as desired.
- Reveal and make active the top layer. This will cover up the blur layer.
- Click on the
 icon to create a white layer mask on the top layer.
- Click on the layer mask, make black the foreground color, then
paint black on the image everywhere you want the blur to be seen
through the top layer (this would be everywhere except the main image.).
- You now have the main image sharp and the back ground blurred.
You may tweak the mask by painting black where it is still sharp
and needs to be blurred. You may also paint white on the areas
that you accidentally painted black and caused something to blur that
need to remain sharp. Zoom in if necessary.
-
Convert an image to black and white except for the main subject
- Open an image that has a main image and a background with distracting colors.
- Create a duplicate layer. Name that layer "black & white"
- Create another duplicate layer. Name that layer "top"
- Hide the top layer.
- With the black & white layer active convert the layer to
B&W with the command "Enhance -- Convert to Black and White"
Adjust the resulting dialog box as needed and click on OK.
- Reveal the top layer. This will cause the image to return to color.
- Create a black layer mask on the top layer by clicking on the
 icon then click on the icon and then click on "ctrl-I". Alternatively click on "alt-
 "
to create the black layer mask. This will block the
top layer (which is in color) and cause the image to become
completely black and white.
- Click on the layer mask and paint white on the black layer mask
on the main image. This will unblock the top layer on the main
image and allow it to return to color.
- As in the previous example, you can tweak the layer mask to fine tune your painting.
- In some cases you might also want to blur the black and white layer to make it even less distracting.

-
Darken the edges of a photograph
- Many images, especially landscapes, can be improved by
darkening the edges of the image. This will tend to draw the eyes
of the viewer towards the center portion of the image. Open such
an image.
- Create a duplicate layer. Name that layer "bottom".
- Create another duplicate layer. Name that layer "top"
- With the rectangular marque tool select the center portion of the image leaving a good sized border outside the selection.
- Feather the selection with the command "Select -- Feather".
Make the feathering about 300 pixels. This will round the
corners as well as keep the selection from having a well defined edge.
- Use the command "Select -- Inverse" so that the boarder is selected instead of the center if the image.
- Create a layer mask for the top layer by clicking on the
 icon. Note that the edge of the mask is white (the selected area)
while the center is black. This will block the center from the
following actions.
- Click on the image icon of the top layer in the layers palette.
Darken the top layer with the command "Enhance -- Lighting --
Levels" and moving the center slider to the right. Darken the
image to almost black.
- You can further soften the edges of the mask by clicking on the mask then blur the mask with the command "Filter -- Blur -- Gaussian Blur" and set the blur to around 250 pixels or more.
- Reduce the opacity of the top layer to 20% or less so that the edges are darkened but only so that it is not distracting.
- You may tweak the mask by clicking the mask and painting white
on the portions that have been darkened too much. You should
reduce the opacity of the brush to about 25% to gain more control.
-
Place an image in an oval frame
- Open an image with an object you would liked framed.
- Create a duplicate layer. Name that layer "bottom"
- Create a new layer with the command "New -- Layer". Name that layer "frame". Hide the frame layer.
- With the elliptical marque tool create an oval selection around
the object you want framed. Outside of the selection will become
the frame.
- Reveal the frame layer. Add a layer mask to the frame layer by clicking on the
 icon.
icon.
- Click on the image of the frame layer in the layers palette.
- Make the foreground color black then using the paint bucket
tool click on the main image. This will cause the layer frame to
be painted black and you will have an oval framed image.
- You may change the color of the frame by selecting a different
foreground color and using the paint bucket tool clicking on the main
image.


