Lab Color Space home
Preliminary Information Needed
To understand the techniques that are used in these pages there are
some basic Photoshop concepts that are needed. Some of these are
described on this page.
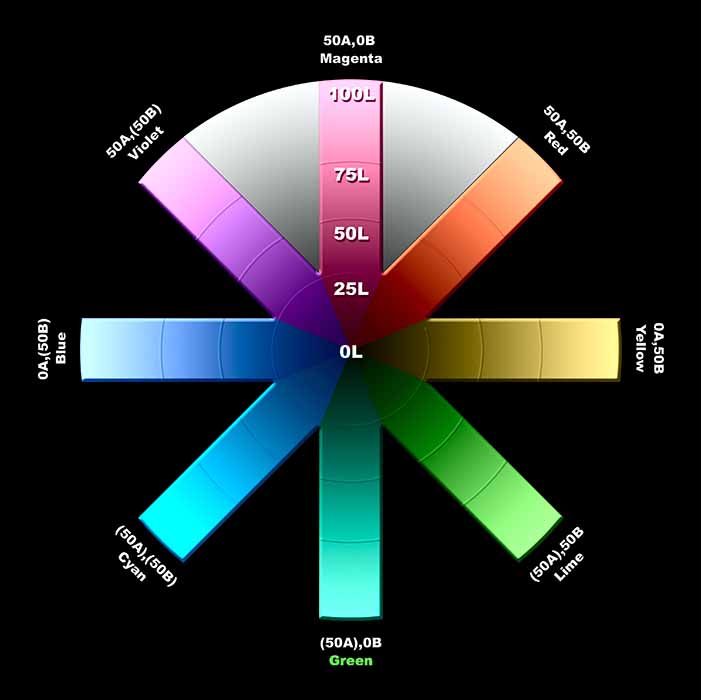
Lab Color Space Channels
- L channel – luminosity
- a channel – green to magenta, negative is green,
positive is
magenta
- b channel – blue to yellow, negative is blue,
positive is
yellow.
- Positive a & b values are warm tones (magenta and yellow), negative
a&b values
are cool tones (green and blue).
- Neutral (gray) tones from pure black to pure white – both a & b
channels are zero.
- Faces – a & b (magenta and yellow) are both positive with b
more positive than
a (more yellow) except for small children & light skinned Caucasians where
a = b.
- Natural greenery – a is negative (green) and b is
positive (yellow) with b
further from zero than is a (more yellow than green)
- Skys – b is negative (blue) and a is near zero but
slightly negative (green)
Blend-If Command
The use of the blend-if allows you to selectively apply a blending mode under a variety of parameters.
- With the top of two layers to be blended selected use the command
"Layer - Layer Style - Blending Options" to bring up the Layer Style
dialog box. The blend-if options are on the bottom half of the
dialog box.
- You may select which channel you wish to base the blending on.
- You have the option of using the top or bottom layer to base the blending.
- Move the left (black) slider to the right and the right (white)
slider to the left. Blending will occur when the channel values
are between the black and white slider positions. Blending will
not occur outside the slider positions.
- However, if you cross the black and white slider so that the
white slider is to the left of the black slider blending will occur
outside the slider positions (and not otherwise).
- You may split the black (or white) slider by clicking and moving
the black (or white) slider while also holding down the alt key.
When a slider is split the blending will occur on a graduated
basis from one half of the slider to the other half.
Set an Anchor Point in a Curve from the Image
- Open an image
- Select the eye-drop tool from the tool bar.
- Open a curves adjustment layer.
- With the eye-dropper over the image press and hold the control
key then click on the left mouse button. This will set an anchor
point on the curve in the channel that is active. This anchor
point will match the point that you clicked.
- You may repeat this process for any of the channels.
- If, after you have pressed the control key if you press and hold
the mouse button and move the eye-dropper to any point in the image.
While you are moving the eye-dropper the point on the curve
representing the eye-dropper will also move in a corresponding pattern.
- Alternatively, instead of control-click you may use shift-control-click. This will set an anchor point in all channel curves of your image.
- As a reminder: You may remove an anchor point by clicking and dragging it off the curves dialog box.
The Info Pallet and Sampler Points
- The info pallet contains, by default, four panels.
The upper left (the first color readout) is the coordinates of
the point (by default, in the current color space) where the cursor is
located.
- The upper right panel (the second color readout) contains the
coordinates of the point where the cursor is located. The color
space here is fixed and by default is RGB.
- To select the color space click on the menu icon to the right of
the INFO tab and select Panel Options. From the options make
selections for the first color readout (the default is "Actual Color")
and the second color readout (recommended "LAB Color" for these pages)
- To set a sampler point:
Select the color sampler tool. Click to establish a new sampler
point. The sampler point information will appear in the info
palette. It will be the channel values the point using the
current color space (RGB, CMYK, or LAB)
- To move the sampler point
to a different location, with the color sampler tool selected click and
drag the info point to a different location in the image.
- To remove an sampler point, with the color sampler tool selected click
and drag the info point off of the image.
- You may have up to four (4) sampler points in an image.
Bring up Greens
- Duplicate layer
- Bring up Channel Mixer adjustment layer
- Set Output to Red
- Decrease green and increase blue the same percentage.

